How Braces are Applied

If your orthodontist has recommended traditional metal braces to align your teeth and bite, you may be wondering what you should expect. After all, you will be wearing your braces for the next year or so, which can make you wonder how exactly these things are supposed to stick to your teeth for that long. In order to prepare for the application of your braces, here is some information about how braces are applied:

Step #1: Spacers
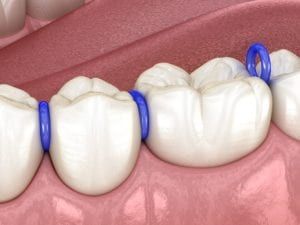
Before your orthodontist places your braces, they may need to place spacers. Spacers are small rubber bands that are placed between the back teeth in order to make room for the bands that will go around your back teeth. Since spacers force your teeth to move, you will likely experience some soreness as your teeth begin to shift.
Step #2: Preparation
On the day of your braces appointment, your orthodontist will likely ask you to brush and floss before your appointment. If you are unable to do so, they may ask you to brush and floss in their office. This is so your teeth are clean before the braces are placed. After your teeth have been cleaned, they will also need to be dried. This is usually done in sections so that only a few teeth are dry at one time. Once your orthodontist begins, the entire application process takes about two hours.
Step #3: Brackets
Once your teeth are clean and dry, your orthodontist can begin placing the brackets. Brackets are small metal or ceramic devices that are placed on each tooth in order to hold the archwire in place. The first step to placing the brackets is for your orthodontist to place a spot of glue in the center of your tooth. This glue is then hardened in place with a blue curing light. Next, the bracket itself will be placed over the glue and hardened in place.
Step #4: Bands
While the rest of your teeth will be decorated with brackets, your back molars will have metal bands placed around them to act as an anchor. If you had spacers placed, these will be removed and replaced with the metal bands. First, your orthodontist will slip on a few different band sizes to determine the best fit for your tooth. Once the band size has been determined, glue will be placed on the inside of the band and the band will be slid onto your tooth. Just as with the brackets, the blue curing light will be used to harden the band in place. Some patients may experience pressure or mild discomfort when having molar bands placed.
Step #5: Archwires
An archwire is the long metal or ceramic wire that reaches from one end of your mouth to the other. You will have two archwires placed: one for the upper arch and one for the lower arch. Throughout the rest of your treatment, the archwire will be adjusted to obtain the necessary tooth movement.

Step #6: Choose Your Colors
The final step of having braces placed is perhaps one of the most popular steps. This is the step where you get to choose what color rubber bands to place over your brackets. In addition to allowing you to express yourself with your favorite color schemes, these rubber bands also work to hold the archwires in place.
Step #7: Education
After your braces have been placed, your orthodontist will take a few minutes to explain how to care for them. They will likely provide you with some necessary supplies to keep your braces clean, as well as some dental wax to cover any sharp edges. If you have any questions about your braces, this is the best time to get answers.
 Dr. Massih attended UCLA, where she graduated Magna Cum Laude with a degree in psychobiology. She then went on to earn her DDS degree at UCLA’s School of Dentistry, where she was awarded the Dean’s Scholarship, and was in the top 10% of her class. She has received her certificate in Orthodontics and Dentofacial Orthopedics at the University of Pittsburgh and is a member of the American Association of Orthodontists, Pacific Coast Society of Orthodontists, & American Dental Association.

Recent Comments